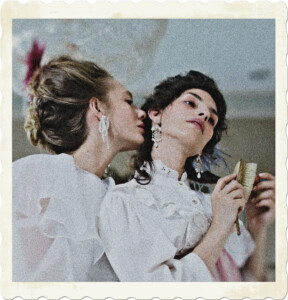
• – Fill Light and Clarity

    Creating the Base – Part 2

    This is part 2 of the Creating the Base tutorial and in Part 1 we performed Initial Cleanup Operations.

    Original-Noise Removal.png

    Now we need to adjust lighting, contrast, colour and clarity since the original portrait was featured in a sombre room. Fortunately, the Boston Museum of Fine Art provides us with a sample to compare with.

    Let us begin with Fill Light and Clarity, from the Adjust menu, select Brightness and Contrast then Fill Light/Clarity.

    Process - Brightness - Menu.png

    I find it easier to Preview on Image so I can monitor a change over the whole work. To make use of this capability, click on Preview to hide that feature then select the Preview on Image checkbox.

    Process - Brightness - Window.png

    Fill Light will brighten while Clarify brings out details in the picture. The settings shown above worked well for me; however, you may find alternate settings that better suits your palette.

    Original-Clarify-Fill-Light.png

    Next in Part 3 we will experiment with Hue, Saturation and Lightness.


  • Let’s Begin

    Creating the Base – Part 1

    This is part 1 of the Creating the Base tutorial.

    The First step is to find an image that will form the basis for your cover. For The Portrait, I rummaged through my photography collection and came across this picture featured below.

    Original.png

    This shot suited my needs since it fit in roughly with the era one of the character’s was based in. For more information on the featured painting, you can visit theSusan Apthorp (Mrs. Thomas Bulfinch) painting found through the Boston Museum of Fine Arts website.

    Copyright law can be difficult to interpret and varies from country to country. While this painting falls outside normal copyright laws, in some jurisdictions the picture can be copyrighted as a new work. The referenced work is likely copyrighted, so I used my own picture as a precaution.

    The picture is unfortunately low-resolution (5 MP) compared to modern cameras, even when compared to high-end smartphone. In addition, noise was introduced due sensitivity (200 ISO) of the light sensor to avoid using a flash.

    Fortunately, there are ways to deal with the noise and we will deal with the limited resolution later. From the Adjust menu, select the Digital Noise Removal.

    Process - Digital Noise Removal - Menu.png

    This will bring up a new window which shows a Before and After shot along with various options. One of the more important features of this capability is the ability to adjust the sampling locations.

    Process - Digital Noise Removal - Window.png

    In my case, I found that the defaults were sufficient. Click on the OK button to remove residual noise in the shot and generate the result shown below.

    Original-Noise Removal.png

    Next in Part 2 we will experiment with Fill Light and Clarity.


  • Tourtière du Lac-Saint-Jean

    Lac-Saint-Jean Meat Pie

    Tourtière du Lac-Saint-Jean

    The tourtières that hail from the Lac-Saint-Jean region are slow-cooked deep-dish meat pies made with potatoes and various meats cut into small cubes or diced.  Some families will serve it as-is or topped with a hunter sauce or ketchup.

    (more…)

Search
%d bloggers like this: