There are several reasons to generate a clean EPUB.
- Consistency. Consistent styles to maintain the same look and feel across platforms.
- Simplicity. With fewer interactions between CSS styles, changes are easier to implement and track.
- Human readable. Easy to find chapters, sections and styles.
- Convertible. Simple styles lend to consistent conversions between formats. Creates Microsoft Word documents with fewer embedded Styles.
Of course, there are disadvantages.
- Investment. Generating documents requires time and effort. However, since the the styles are reusable, the level of effort for future releases is reduced.
- Technical knowledge. This requires more than a passing familiarity with Markdown, XHTML, CSS, and Calibre. However, there is pleny of documentation available online to help.
While the disadvantages can dissuade people from experimenting with this capability, I found it simplified my eBook submission process. I can target Draft2Digital, Google Play, and Amazon Kindle, using one EPUB, and maintain advanced formatting like realistic text messaging throughout.
This tutorial focuses on features Calibre offers to make EPUB management easier. These tips and tricks may prove invaluable for debugging an eBook in the future.
Jump to topic:
- Normalise and Scrub the Manuscript
- Generate an EPUB
- Adjust the EPUB
- Apply New Styles
- Table of Contents
- Hyperlinks
- Trick and Tips
- Convert Back to a Manuscript
So let’s move on to the hard stuff:
Normalise and Scrub the Manuscript
This process is covered under the following tutorials:
- Normalise. The Normalise a Manuscript in 4 Easy Steps tutorial uses the Find and Replace function within Microsoft Word to normalize spacing.
- Scrub. The Clean Manuscripts Using Markdown tutorial uses Google Docs to generate a Markdown formatted document.
Generate an EPUB
With an appropriately formatted Markdown document, you must:
- Import the manuscript into Calibre:
- Click on Add Books.
- Select the Markdown manuscript.
- Click on Open.
- A new entry will appear.
Note
Some versions of Calibre fail while converting Markdown manuscripts when images are referenced. If this occurs, put in placeholders in the Markdown manuscript and try again.
- Update the metadata;
- Select book entry.
- Click on Edit metadata
- Edit the match your eBook information, which includes uploading the cover.
- Click on OK.
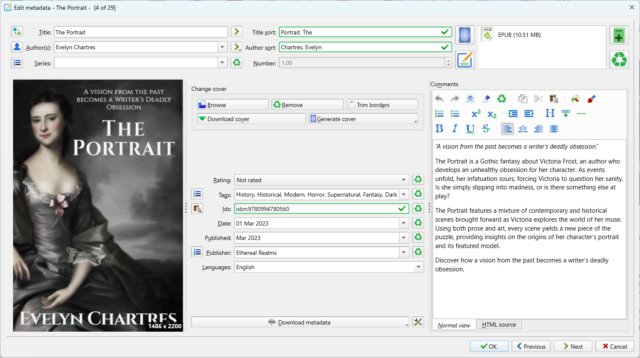
Note
The Tags section of the metadata is an excellent place to store keywords used for book submissions.
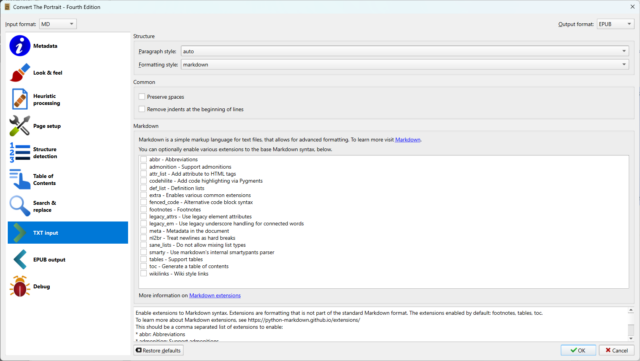
- Convert the Markdown to an EPUB.
- Select book entry.
- Click on Convert Books
- Set Input format to MD
- Set Output format to EPUB
- Click on TXT input
- Set Formatting style to markdown
- Uncheck all boxes under Markdown.
- Click on OK.
- (Optional) Remove the Markdown manuscript after conversion. The EPUB will serve as our default source document for future conversions.
Note
The Calibre eBook Editor supports the EPUB and AZW3 formats exclusively.
Adjust the EPUB
Calibre generates EPUBs using generic names for styles and reference points. You should be aware of the following:
- There’s a potential for overlapping styles, due to the parent’s document formatting. This effect is negated when converting from a Markdown source.
- The conversion process assigns numbers to styles based on where they appear in the document.
- Styles may apply to a narrow part of the manuscript.
We want styles that are appropriately named, simple, consistent, and human readable. The existing styles need to be removed, along with any references to them. We then apply our own default styles and augment with enhancements as needed.
Note
Default styles should include definitions for default elements such as BODY, P, H1, H2, H3 and A. Since the bulk of the manuscript relies on these elements, adjusting the defaults applies to follow-on elements.
Swap out Styles
To proceed:
- Erase all the styles shown in stylesheet.css.
- Click on Tools.
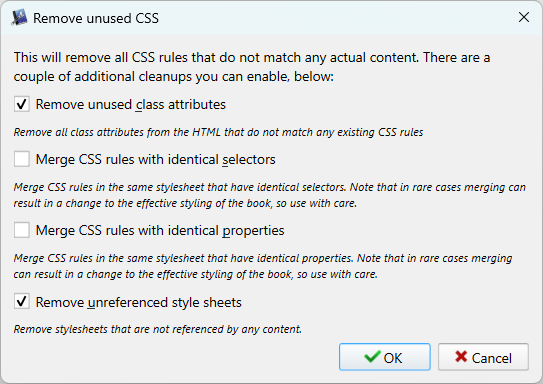
- Click on Remove unused CSS rules.
- Ensure that the following are checked:
- Remove unused class attributed
- Remove unreferenced style sheets
- Click on OK.
- Continued…
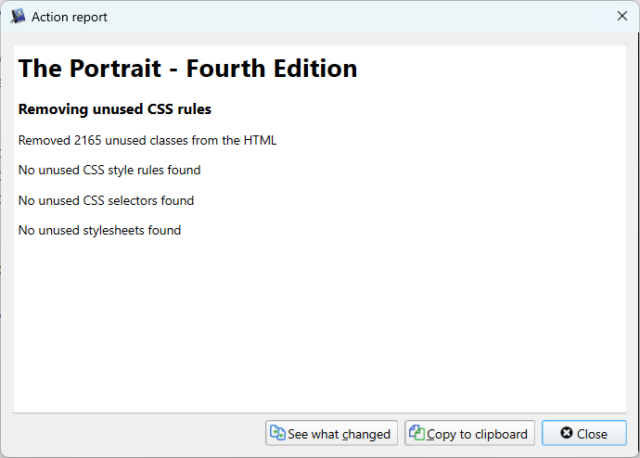
- An Action result window will pop-up.
- Click on Close.
- Replace with your own styles.
Note
Once the stylesheet meets your needs, keep a copy of it and apply it to future projects. This saves time for future releases.
Beautify the Code
This process separates XHTML elements and indents to make the code easier to read. You may need to repeat this step several times as changes are introduced to ensure the code is easy to follow.
To proceed:
- Click on Tools.
- Click on Beautify all files.
- A pop-up may appear. Close it.
Note
Be aware that this will also clean up and organise the XML code within your SVG images. In my experience, there were no adverse effects to beautifying a SVG.
Insert Images
By default, a Markdown document does not contain images. The images will need to be imported, referenced and styled. The Basic Image Styles in EPUB tutorial offers styles for a range of uses.
To insert:
- Click on File.
- Click on Import files into the book. A new window will open.
- Select the files you wish to import.
- Click on Open.
Confirm the files have been inserted. To re-link the files, use the Check Book functionality to find any images that need to be linked.
Apply New Styles
This step is labour intensive. You’ll need to click on every index_split_0XX.html file and apply styles as necessary. Mostly, that’s focusing on headers, drop capitals, scene changes, images, and so forth. The following tutorials may apply:
- Image Styles. The Basic Image Styles in EPUB tutorial features styles applied to images to meet various needs.
- Drop Caps. The Drop Caps in EPUB tutorial covers how to implement drop capitals.
- Text Messaging. The Realistic Text Messaging in EPUB tutorial covers how to mimic Text Messaging.
For example, the code below was generated using Calibre:
Original Code
  <head>
    <title>Unknown </title>
    <meta http-equiv="Content-Type" content="text/html; charset=utf-8"/>
  <link rel="stylesheet" type="text/css" href="stylesheet.css"/>
<link rel="stylesheet" type="text/css" href="page_styles.css"/>
</head>
  <body class="calibre">
<h2 id="calibre_toc_4" class="calibre9">CHAPTER 1</h2>
<h3 class="calibre10">PAST EVENTS</h3>
<p class="calibre1">Victoria moved away from the family home, a
 place filled with the ghosts of her parents. It was now a mausoleum
 where the shadows of their life haunted every nook and cranny.
 Instead of facing such horrors, she settled into her own apartment
 and was thankful for it even though her tears had barely dried from
 her reddened cheeks. This new home would serve as her refuge away
 from those lingering memories which haunted her now as her parents
 had done in life.</p>
<p class="calibre1">It had been a thoroughly exhausting month for an
 only child, especially one raised under the protective wings of her
 parents. This period proved to be especially taxing on her. Events
 flowed at a dizzying pace from one to another until it formed into
 a maelstrom that overwhelmed everything in its way. Victoria felt
 detached from her body, helpless to fight the destruction this storm
 wreaked and forced to submit to the fact that she was nothing more
 than a hapless spectator. Throughout her ordeal, a small part of her
 realised she would eventually need to face what had transpired.</p>
Once you add in your styles, you may see something like:
Updated Code
<head>
  <title>The Portrait by Evelyn Chartres</title>
  <link rel="stylesheet" type="text/css" href="stylesheet.css"/>
  <link rel="stylesheet" type="text/css" href="page_styles.css"/>
</head>

<body>

  <h2 id="Chapter_1">CHAPTER 1</h2>

  <p class="blockSubtitle">PAST EVENTS</p>

  <p><span class="blockFirstCharacter">V</span>ictoria moved
   away from the family home, a place filled with the ghosts of her
   parents. It was now a mausoleum where the shadows of their life
   haunted every nook and cranny. Instead of facing such horrors,
   she settled into her own apartment and was thankful for it even
   though her tears had barely dried from her reddened cheeks.
   This new home would serve as her refuge away from those
   lingering memories which haunted her now as her parents had
   done in life.</p>

  <p>It had been a thoroughly exhausting month for an only child,
   especially one raised under the protective wings of her parents.
   This period proved to be especially taxing on her. Events
   flowed at a dizzying pace from one to another until it formed
   into a maelstrom that overwhelmed everything in its way.
   Victoria felt detached from her body, helpless to fight the
   destruction this storm wreaked and forced to submit to the fact
   that she was nothing more than a hapless spectator. Throughout
   her ordeal, a small part of her realised she would eventually
   need to face what had transpired.</p>
Overall, the information is the same, but styles only apply to elements that differ from the norm. Since we rely on defaults, the bulk of the project uses base elements such as P, H1, H2 and so forth.
For every chapter file consider:
Renaming the File
The auto-generated file names have no meaning and make searching for the appropriate section or chapter a pain. Giving these files meaningful names will help you narrow down the applicable sections quickly.
To rename:
- Right-mouse click on the appropriate
index_split_0XX.htmlto bring up a pop-up menu. - Click on
Rename index_split_0XX.html. A cursor will appear over the file name. - Apply a meaningful name and change the extension to
.xhtml. - A pop-up window appears to warn you about the effects of changing the file. Click on Yes to proceed.
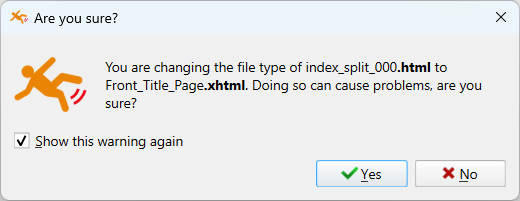
File extensions are changed to comply with EPUB Version 3 specifications. Doing so ensures the EPUB passes an EPUB Check later.
Note
Renaming the files automatically updates any references within the eBook. As a result, your table of contents will continue to function as expected.
Add an Anchor
XHTML elements can be identified by giving them a unique identifier. This directs readers to specific chapters or even parts within a chapter. These anchors are then used to generate the Table of Contents.
Normally you would target an H1 or H2 element within your eBook. A good example of this applies below:
<h2 id="calibre_toc_11">CHAPTER 8</h2>
While there may be a generated ID present, we want something meaningful.
<h2 id="Chapter_8">CHAPTER 8</h2>
If you’re using chapter art, you’ll want to move the identifier into the DIV, or IMG element. This ensures that readers don’t skip the image when they jump into the chapter.
Note
Calibre generates anchors at the bottom of the chapter. Unless these are needed, remove them.
Table of Contents
The auto-generated table of contents will break when adjusting anchors. Fortunately, updating the table to content is easy.
- Click on Tools.
- Click on Table of Contents.
- Click on Edit Table of Contents.
A sample screen can be found below:
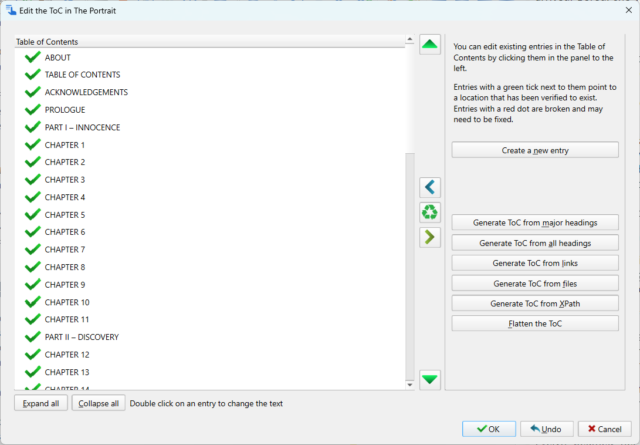
Here are a few functions to be aware of:
Remove this Entry
When an entry within the Table of Contents is selected this option will appear. Entries can’t be removed in bulk, so you’ll need to select the top and click on Remove this Entry until they are cleared.
Note
After selecting an entry, you’ll need to either remove every listed entry or click on the Return to welcome screen button to get back to the main view.
Generate ToC from All Major Headings
This generates a clean Table of Contents using all the anchors you specified. If you have a mix of H1, H2 and H3 elements present, you may end up with a collapsible Table of Contents.
Note
A collapsible Table of Contents doesn’t work consistently across all devices. Skipping a chapter on my Kindle Keyboard would bypass the entire collapsible group.
Flatten the ToC
This feature flattens your Table of Contents and puts them all on the same level. This ensures maximum compatibility with devices, at the expense of esthetics.
Hyperlinks
The manuscripts Table of Contents’ imported from Markdown has no links. We need to add in the hyperlinks so users can jump to the appropriate chapter or section.
Hyperlinks can be accessed:
- Select the text.
- Click on Insert Hyperlink on the toolbar. A new window will appear.
- Select the Section, and Anchor.
- Click on OK.
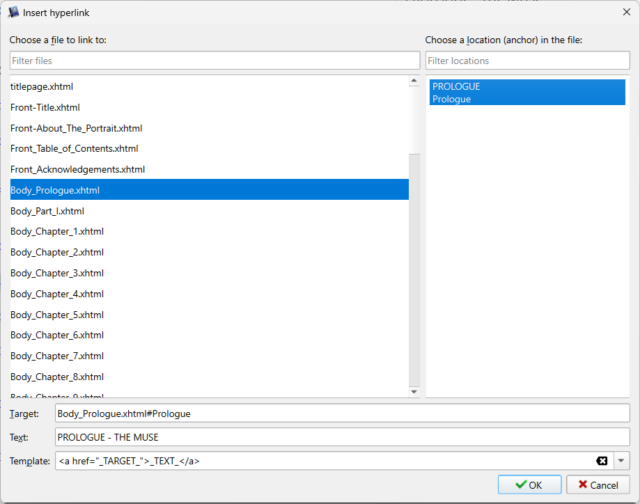
Run a check on your external links to confirm the validity of links. This can be done in one step by:
- Click on Tools
- Hover over the External links.
- Click over Check external links.
Tricks and Tips
Find and Replace
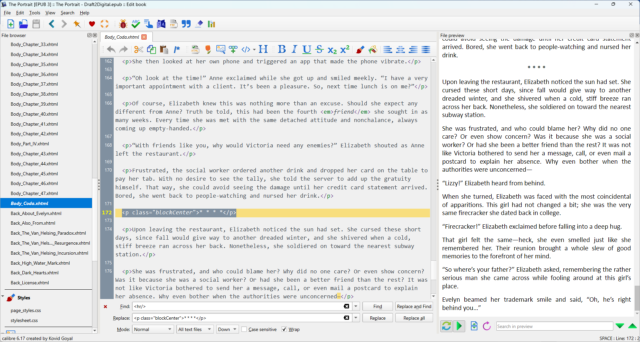
Find and Replace is activated by using the CTRL-F combination or by clicking on Find and Replace under the Search menu. This functionality allows us to find images, or replaces XHTML elements that eixist throughout the eBook.
A common element to update would be the scene dividers. They can be found by searching for the HR element which replaced * * * * during conversion. The example below changes HR to a P element that centres itself. This applies just as well to image-based scene dividers.
Another common element to adjust is the TITLE element of the pages. I typically set the name of the Book and Author instead of leaving it blank.
Note
The second drop-down menu is used to narrow the search. In general you’ll want to Find and Replace across all files. However, you’ll sometimes need to limit it to a chapter or section.
Upgrade Internals
This functionality can be found under the Tools menu. It updates the EPUB to comply with the EPUB Version 3 specification. This is necessary to access the advanced features, such as SVG image support.
Version 3 is supported across most vendors; however, you may find that services such as Draft2Digital can’t integrate with them. For, me SVG support outweighs these concerns.
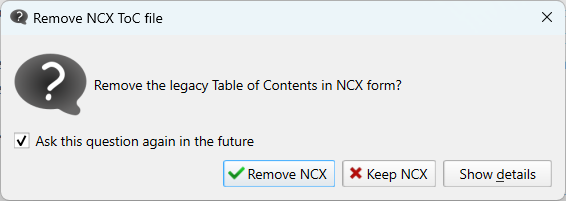
As part of the upgrade, the NCX formatted Table of Contents may be removed. Barnes and Noble refuses submitted eBooks without this legacy file structure in place. When you upgrade:
- Keep the file to maintain compatibility, or
- Re-create the file automatically when you edit the Table of Contents.
Debug Your Ebook
The Check Book functionality in Calibre confirms that the eBook contains no code or reference faults. To activate this functionality:
- Click on Tools.
- Click on Check book. A new section will be added to the main screen.
- Double-click on a warning to be directed to the source.
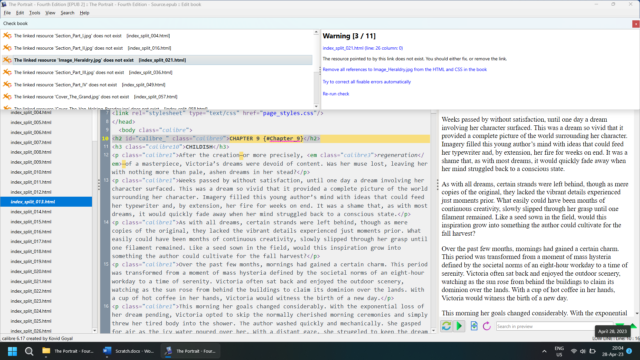
Check Book shows warnings and errors. Prior to publishing the eBook you’ll need to confirm these faults have been cleared.
Note
While Check Book is a useful feature, the file should still be run through EPUB Check. The compliance check catches additional errors that may be flagged during publishing.
Image Compression
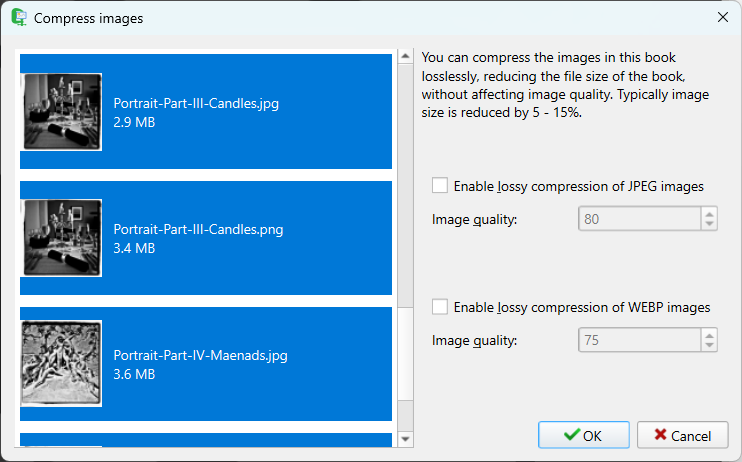
There are often file size limits for publishing an EPUB. The number and size of images play a large part in the final total. Calibre offers lossy and lossless compression of images based on your needs. To compress your images:
- Click on Tools
- Click on Compress images losslessly. A new window will open.
- Select the desired options
- Click on OK.
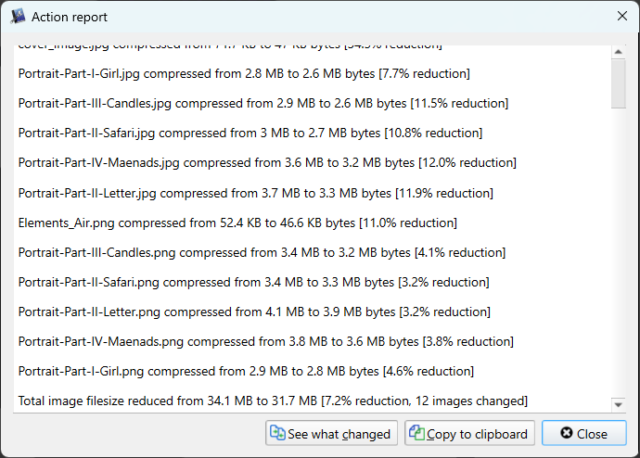
- After the progress bar completes, an Action report will appear.
Note
Repeating lossy compression degrades image quality.
Convert Back to a Manuscript
Calibre can convert your EPUB back into various formats, including Microsoft Word. However, a print document and an eBook have different design goals. Where elements such as images, indentations, and font sizes are all relative for an eBook, that is not the case for print.
To convert back to a manuscript, consider:
- Convert style measurements to absolute. For consistency, you must set explicit sizes and dimensions. That includes:
- Set image sizes inches or centimeters;
- Set font sizes to points;
- Set indentations to specific sizes instead of percentages;
- Inheritance is unpredictable. Default font sizes specified within the
BODYelement doesn’t necessarily spread to sub-elements. For use in print, every style used should define the expected behaviour. This includesEM/I, andSTRONG/BOLD. - Stick with the same names. Keep your style names consistent between the print and eBook variants. That way you can swap out the styles with ease.
- Use Google Docs. Google Docs imports the document cleanly and limits the amount of styles available. Run through the manuscript to find inconsistencies before exporting to Microsoft Word.
That’s it!
![]() Create Clean EPUBs using Calibre by Evelyn Chartres is licensed under a Creative Commons Attribution-ShareAlike 4.0 International License.
Create Clean EPUBs using Calibre by Evelyn Chartres is licensed under a Creative Commons Attribution-ShareAlike 4.0 International License.


Leave a Reply